[TIL] Spring 숙련 - 필터와 Spring Security
Spring Filter 요청 전후 처리, JWT 인증/인가 흐름, Spring Security Filter Chain 및 Authentication 구조
For the English version of this post, see here.
공부한 내용
필터
- Filter
- Web 애플리케이션에서 관리되는 영역으로 Client로부터 오는 요청과 응답에 대해 최초/최종 단계의 위치이며 이를 통해 요청과 응답의 정보를 변경하거나 부가적인 기능을 추가할 수 있음
- 주로 범용적으로 처리해야 하는 작업들, 예를 들어 로깅 및 보안 처리에 활용함
또한 인증, 인가와 관련된 로직들을 처리할 수도 있음
Filter를 사용하면 인증, 인가와 관련된 로직을 비즈니스 로직과 분리하여 관리할 수 있다는 장점이 있음
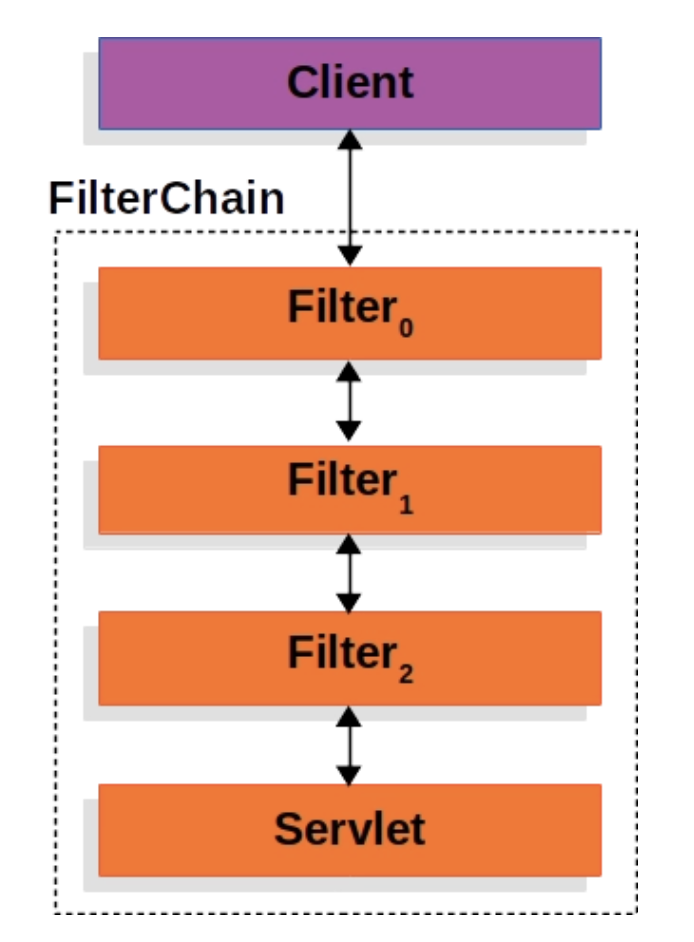
- Filter Chain
- Filter는 한 개만 존재하는 것이 아니라 여러 개가 Chain 형식으로 묶여서 처리될 수 있음
- Filter는 한 개만 존재하는 것이 아니라 여러 개가 Chain 형식으로 묶여서 처리될 수 있음
Filter 적용
요청 URL의 인가 처리 및 인증 처리를 진행할 수 있는 Filter 구현 예정
추가로 요청 URL을 로깅해주는 Filter도 구현 예정
Request URL Logging
1
2
3
4
5
6
7
8
9
10
11
12
13
14
15
16
17
 @Slf4j(topic = "LoggingFilter")
 @Component
 @Order(1)
 public class LoggingFilter implements Filter {
     @Override
     public void doFilter(ServletRequest request, ServletResponse response, FilterChain chain) throws IOException, ServletException {
         // 전처리
         HttpServletRequest httpServletRequest = (HttpServletRequest) request;
         String url = httpServletRequest.getRequestURI();
         log.info(url);

         chain.doFilter(request, response); // 다음 Filter 로 이동

         // 후처리
         log.info("비즈니스 로직 완료");
     }
 }
@Order(1)로 필터의 순서를 지정합니다.chain.doFilter(request, response);다음 Filter로 이동시킵니다.log.info("비즈니스 로직 완료");- 작업이 다 완료된 후 Client에 응답 전 로그가 작성된 것을 확인할 수 있습니다.
AuthFilter: 인증 및 인가 처리 필터
1
2
3
4
5
6
7
8
9
10
11
12
13
14
15
16
17
18
19
20
21
22
23
24
25
26
27
28
29
30
31
32
33
34
35
36
37
38
39
40
41
42
43
44
45
46
47
48
49
50
51
52
53
 @Slf4j(topic = "AuthFilter")
 @Component
 @Order(2)
 public class AuthFilter implements Filter {

     private final UserRepository userRepository;
     private final JwtUtil jwtUtil;

     public AuthFilter(UserRepository userRepository, JwtUtil jwtUtil) {
         this.userRepository = userRepository;
         this.jwtUtil = jwtUtil;
     }

     @Override
     public void doFilter(ServletRequest request, ServletResponse response, FilterChain chain) throws IOException, ServletException {
         HttpServletRequest httpServletRequest = (HttpServletRequest) request;
         String url = httpServletRequest.getRequestURI();

         if (StringUtils.hasText(url) &&
                 (url.startsWith("/api/user") || url.startsWith("/css") || url.startsWith("/js"))
         ) {
             // 회원가입, 로그인 관련 API 는 인증 필요없이 요청 진행
             chain.doFilter(request, response); // 다음 Filter 로 이동
         } else {
             // 나머지 API 요청은 인증 처리 진행
             // 토큰 확인
             String tokenValue = jwtUtil.getTokenFromRequest(httpServletRequest);

             if (StringUtils.hasText(tokenValue)) { // 토큰이 존재하면 검증 시작
                 // JWT 토큰 substring
                 String token = jwtUtil.substringToken(tokenValue);

                 // 토큰 검증
                 if (!jwtUtil.validateToken(token)) {
                     throw new IllegalArgumentException("Token Error");
                 }

                 // 토큰에서 사용자 정보 가져오기
                 Claims info = jwtUtil.getUserInfoFromToken(token);

                 User user = userRepository.findByUsername(info.getSubject()).orElseThrow(() ->
                         new NullPointerException("Not Found User")
                 );

                 request.setAttribute("user", user);
                 chain.doFilter(request, response); // 다음 Filter 로 이동
             } else {
                 throw new IllegalArgumentException("Not Found Token");
             }
         }
     }

 }
httpServletRequest.getRequestURI()요청 URL을 가져와서 구분합니다. (인가)"/api/user","/css","/js"로 시작하는 URL은 인증 처리에서 제외 시킵니다.
그 외 URL은 인증 처리를 진행합니다.
jwtUtil.getTokenFromRequest(httpServletRequest);httpServletRequest에서 Cookie 목록을 가져와 JWT가 저장된 Cookie를 찾습니다.getTokenFromRequest메서드를 JwtUtil에 구현합니다.1 2 3 4 5 6 7 8 9 10 11 12 13 14 15 16
// HttpServletRequest 에서 Cookie Value : JWT 가져오기 public String getTokenFromRequest(HttpServletRequest req) { Cookie[] cookies = req.getCookies(); if(cookies != null) { for (Cookie cookie : cookies) { if (cookie.getName().equals(AUTHORIZATION_HEADER)) { try { return URLDecoder.decode(cookie.getValue(), "UTF-8"); // Encode 되어 넘어간 Value 다시 Decode } catch (UnsupportedEncodingException e) { return null; } } } } return null; }
tokenValue가 존재하면 토큰 파싱, 검증을 진행하고 사용자 정보를 가져옵니다.
가져온 사용자 username을 사용해서 DB에 사용자가 존재하는지 확인하고 존재하면 인증이 완료된 것입니다.
사용자 정보가 필요한 Controller API에 인증완료된 User 객체를 전달해 줍니다.
1
2
3
4
5
6
7
8
9
10
11
12
13
  @Controller
  @RequestMapping("/api")
  public class ProductController {

      @GetMapping("/products")
      public String getProducts(HttpServletRequest req) {
          System.out.println("ProductController.getProducts : 인증 완료");
          User user = (User) req.getAttribute("user");
          System.out.println("user.getUsername() = " + user.getUsername());

         return "redirect:/";
      }
  }
사용자 본인이 등록한 제품만 조회하는 기능의 API라 가정해보겠습니다.
Filter에서 인증 처리되어 넘어온 User 객체를 사용하면 API 요청을 한 해당 사용자가 등록한 제품만 조회할 수 있습니다.
Spring Security 프레임워크
- Spring Security 프레임워크
- Spring 서버에 필요한 인증 및 인가를 위해 많은 기능을 제공해 줌으로써 개발의 수고를 덜어줌 마치 ‘Spring’ 프레임워크가 웹 서버 구현에 편의를 제공해주는 것과 같음
Spring Security 프레임워크 추가
1
2
  // Security
  implementation 'org.springframework.boot:spring-boot-starter-security'
Spring Security 적용
Spring Security 활성화
Spring Security 설정
1
2
3
4
5
6
7
8
9
10
11
12
13
14
15
16
17
18
19
20
21
22
23
24
25
26
27
28
29
30
31
  package com.sparta.springauth.config;

  import org.springframework.boot.autoconfigure.security.servlet.PathRequest;
  import org.springframework.context.annotation.Bean;
  import org.springframework.context.annotation.Configuration;
  import org.springframework.security.config.Customizer;
  import org.springframework.security.config.annotation.web.builders.HttpSecurity;
  import org.springframework.security.config.annotation.web.configuration.EnableWebSecurity;
  import org.springframework.security.web.SecurityFilterChain;

  @Configuration
  @EnableWebSecurity // Spring Security 지원을 가능하게 함
  public class WebSecurityConfig {

      @Bean
      public SecurityFilterChain securityFilterChain(HttpSecurity http) throws Exception {
          // CSRF 설정
          http.csrf((csrf) -> csrf.disable());

          http.authorizeHttpRequests((authorizeHttpRequests) ->
                  authorizeHttpRequests
                          .requestMatchers(PathRequest.toStaticResources().atCommonLocations()).permitAll() // resources 접근 허용 설정
                          .anyRequest().authenticated() // 그 외 모든 요청 인증처리
          );

          // 로그인 사용
          http.formLogin(Customizer.withDefaults());

          return http.build();
      }
  }
LogginFilter, AuthFilter 등록 해제
1
2
3
4
5
6
7
8
9
10
11
12
13
14
15
16
17
  @Slf4j(topic = "LoggingFilter")
  //@Component
  @Order(1)
  public class LoggingFilter implements Filter {
      @Override
      public void doFilter(ServletRequest request, ServletResponse response, FilterChain chain) throws IOException, ServletException {
          // 전처리
          HttpServletRequest httpServletRequest = (HttpServletRequest) request;
          String url = httpServletRequest.getRequestURI();
          log.info(url);

          chain.doFilter(request, response); // 다음 Filter 로 이동

          // 후처리
          log.info("비즈니스 로직 완료");
      }
  }
1
2
3
4
5
6
7
8
9
10
11
12
13
14
15
16
17
18
19
20
21
22
23
24
25
26
27
28
29
30
31
32
33
34
35
36
37
38
39
40
41
42
43
44
45
46
47
48
49
50
51
52
53
  @Slf4j(topic = "AuthFilter")
  //@Component
  @Order(2)
  public class AuthFilter implements Filter {

      private final UserRepository userRepository;
      private final JwtUtil jwtUtil;

      public AuthFilter(UserRepository userRepository, JwtUtil jwtUtil) {
          this.userRepository = userRepository;
          this.jwtUtil = jwtUtil;
      }

      @Override
      public void doFilter(ServletRequest request, ServletResponse response, FilterChain chain) throws IOException, ServletException {
          HttpServletRequest httpServletRequest = (HttpServletRequest) request;
          String url = httpServletRequest.getRequestURI();

          if (StringUtils.hasText(url) &&
                  (url.startsWith("/api/user") || url.startsWith("/css") || url.startsWith("/js"))
          ) {
              // 회원가입, 로그인 관련 API 는 인증 필요없이 요청 진행
              chain.doFilter(request, response); // 다음 Filter 로 이동
          } else {
              // 나머지 API 요청은 인증 처리 진행
              // 토큰 확인
              String tokenValue = jwtUtil.getTokenFromRequest(httpServletRequest);

              if (StringUtils.hasText(tokenValue)) { // 토큰이 존재하면 검증 시작
                  // JWT 토큰 substring
                  String token = jwtUtil.substringToken(tokenValue);

                  // 토큰 검증
                  if (!jwtUtil.validateToken(token)) {
                      throw new IllegalArgumentException("Token Error");
                  }

                  // 토큰에서 사용자 정보 가져오기
                  Claims info = jwtUtil.getUserInfoFromToken(token);

                  User user = userRepository.findByUsername(info.getSubject()).orElseThrow(() ->
                          new NullPointerException("Not Found User")
                  );

                  request.setAttribute("user", user);
                  chain.doFilter(request, response); // 다음 Filter 로 이동
              } else {
                  throw new IllegalArgumentException("Not Found Token");
              }
          }
      }

  }
@Component를 해제한 이유는 필터가 자동 등록되면 Spring Security 흐름 밖에서 먼저 실행될 수 있기 때문
CSRF
CSRF (Cross-site request forgery) - 사이트 간 요청 위조
공격자가 인증된 브라우저에 저장된 쿠키의 세션 정보를 활용하여 웹 서버에 사용자가 의도하지 않은 요청을 전달하는 것
= “로그인된 사용자인 척, 사용자가 원하지 않은 요청을 몰래 보내는 공격”- CSRF 설정이 되어있는 경우 html에서 CSRF 토큰 값을 넘겨주어야 요청을 수신 가능함
- CSRF 토큰
서버가 HTML 페이지를 줄 때 몰래 특별한 값을 같이 주고
POST 요청할 때 이 토큰도 같이 보내야 함
→ 공격자는 사용자의 쿠키는 자동으로 이용할 수 있지만, HTML 안에 들어있는 CSRF 토큰 값은 모르기 때문에 공격이 막힘
- CSRF 토큰
쿠키 기반의 취약점을 이용한 공격이기 때문에 REST 방식의 API에서는 disable 가능함
REST API에서는 보통 로그인 상태를 세션 쿠키가 아니라 요청마다 프론트가 직접 헤더에 토큰을 넣어서 보내는 방식으로 관리함
1
  Authorization: Bearer JWT토큰
공격 사이트는 이 Authorization 헤더를 마음대로 붙일 수 없음 → 그래서 쿠키 기반 CSRF 공격 위험이 상대적으로 낮음
따라서 JWT 기반 REST API에서는 아래처럼 CSRF protection을 보통 끔
- POST 요청마다 처리해주는 대신 CSRF protection을 disable 함
http.csrf((csrf) -> csrf.disable());
- Spring Security의 default 로그인 기능
Spring Security에서 제공하는 로그인 form 페이지
인증되지 않은 사용자가 인증이 필요한 URL에 접근하면, Spring Security가 기본 로그인 form 페이지(
/login)로 리다이렉트하게 함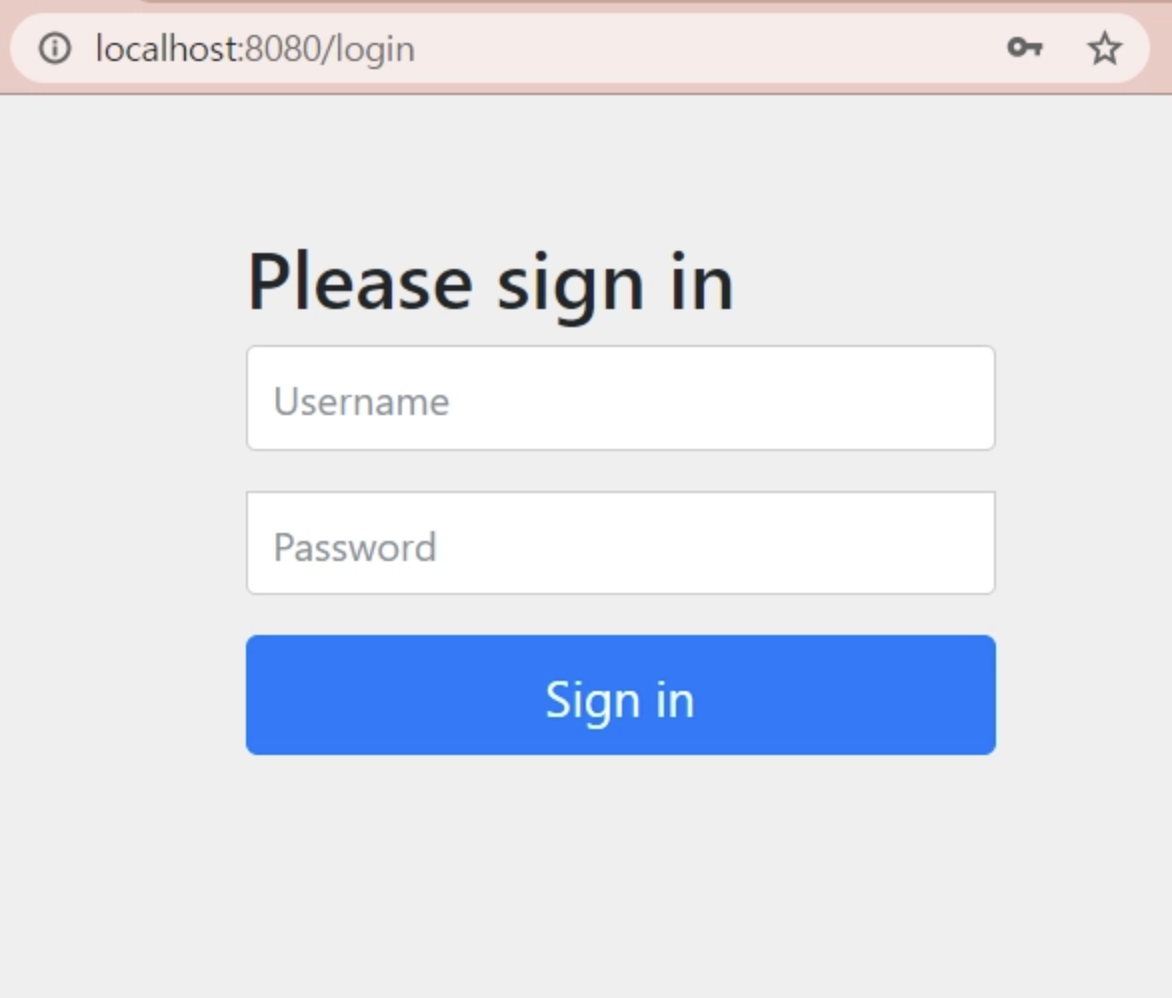
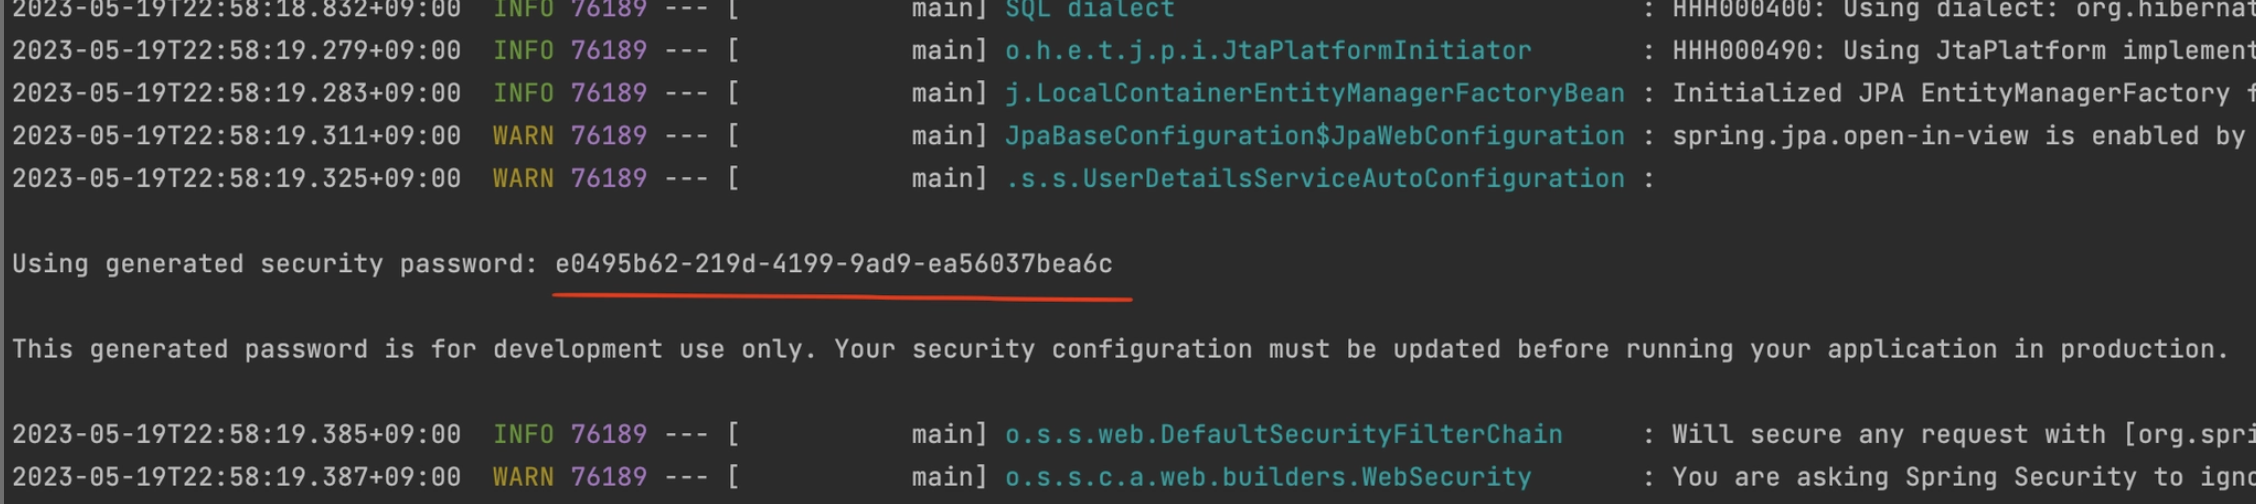
Username: user
Password: S*pring 로그 확인* (서버 시작 시마다 변경됨)
- Spring Security 이해하기
- Spring Security - Filter Chain
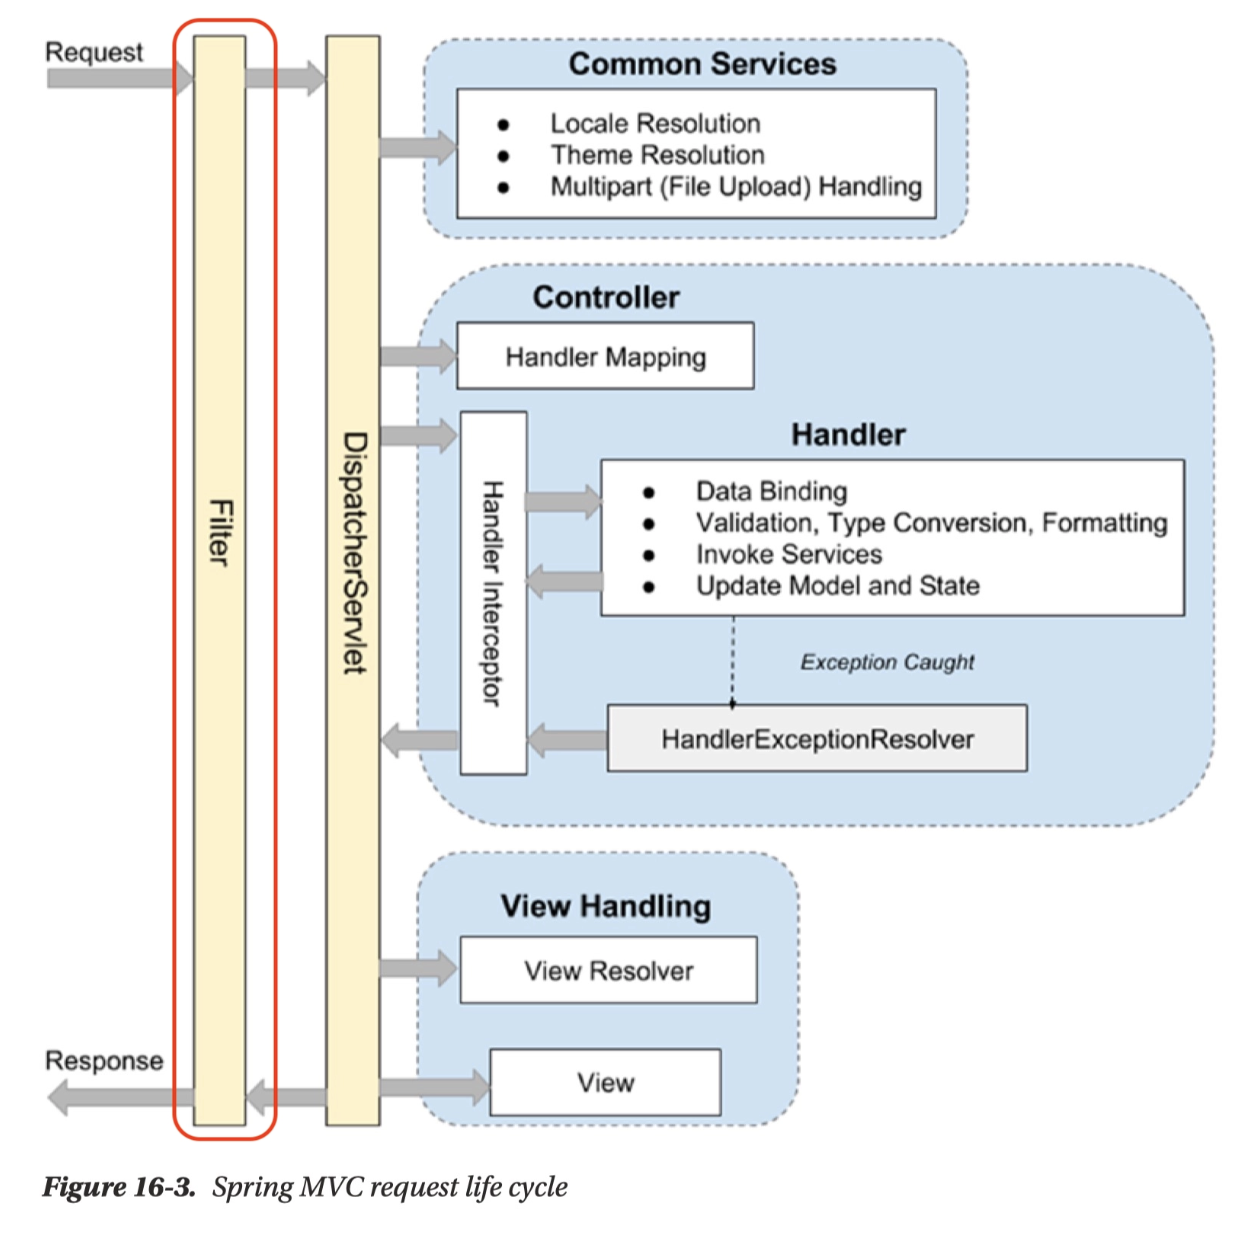
Spring에서 모든 호출은 DispatcherServlet을 통과하게 되고 이후에 각 요청을 담당하는 Controller로 분배됨
이때, 각 요청에 대해서 공통적으로 처리해야할 필요가 있을 때 DispatcherServlet 이전에 단계가 필요하며 이것이 FIlter임
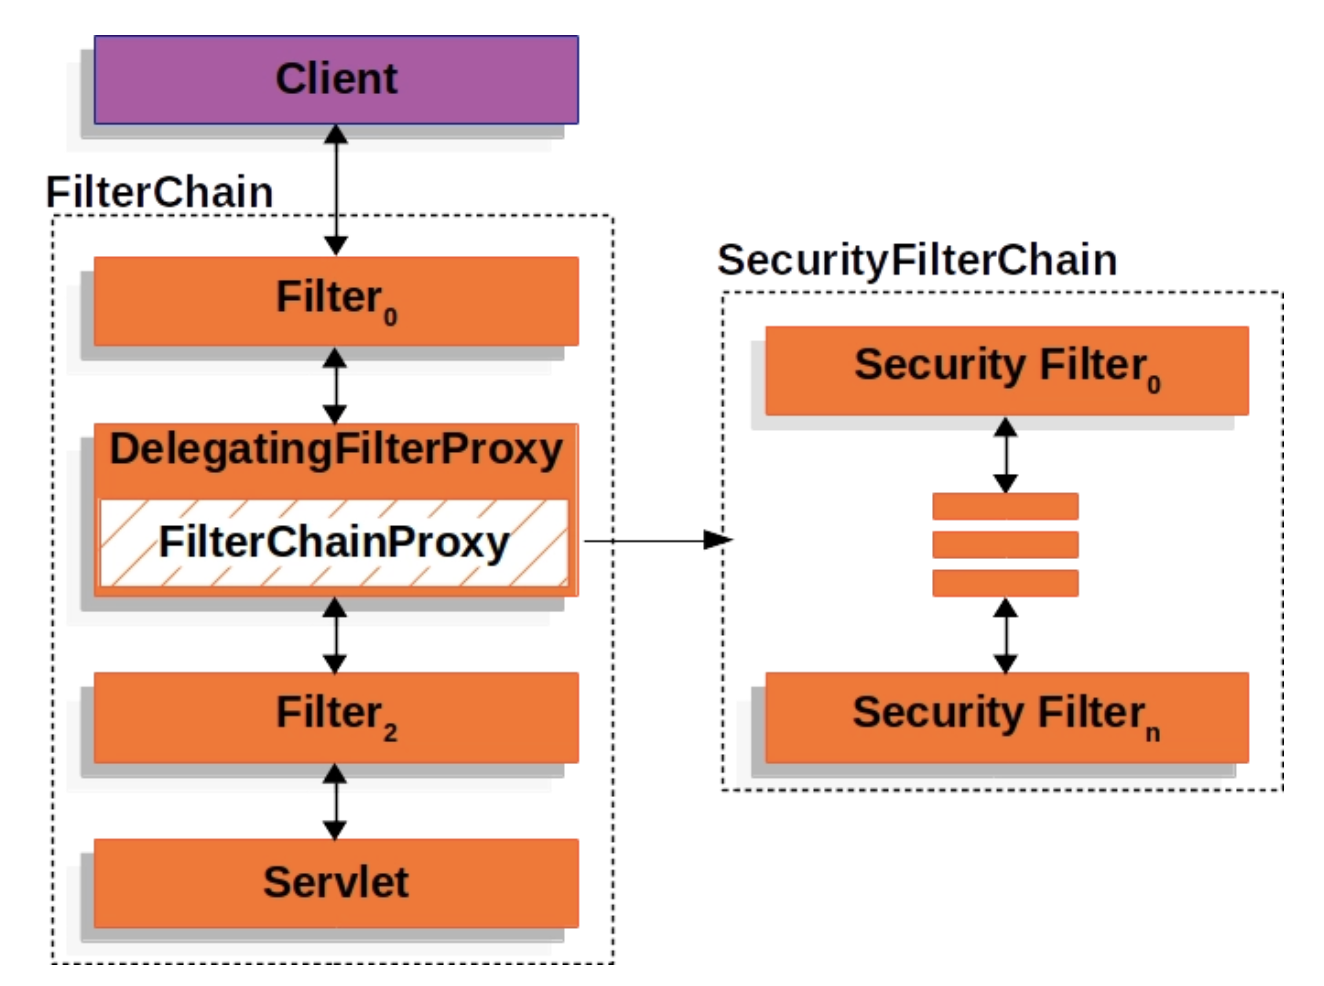
Spring Security도 인증 및 인가를 처리하기 위해 Filter를 사용하는데
- Spring Security는 FilterChainProxy를 통해서 상세로직을 구현하고 있음
Form Login 기반 인증
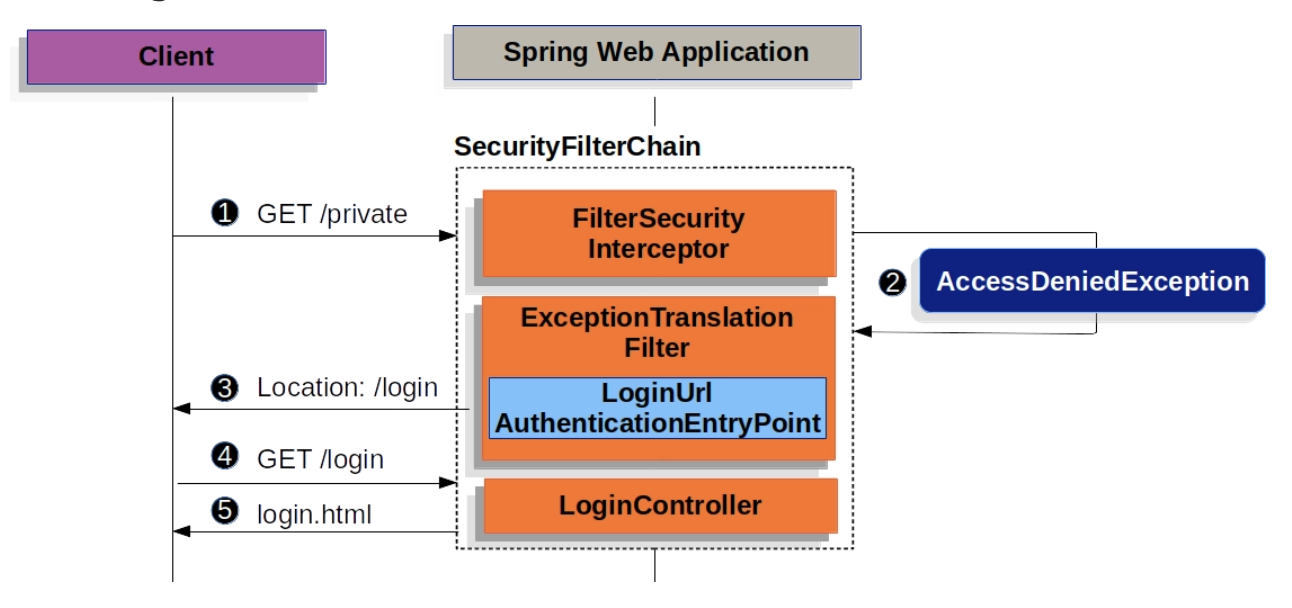
- Form Login 기반 인증은 인증이 필요한 URL 요청이 들어왔을 때 인증이 되지 않았다면 로그인 페이지를 반환하는 형태
UsernamePasswordAuthenticationFilter
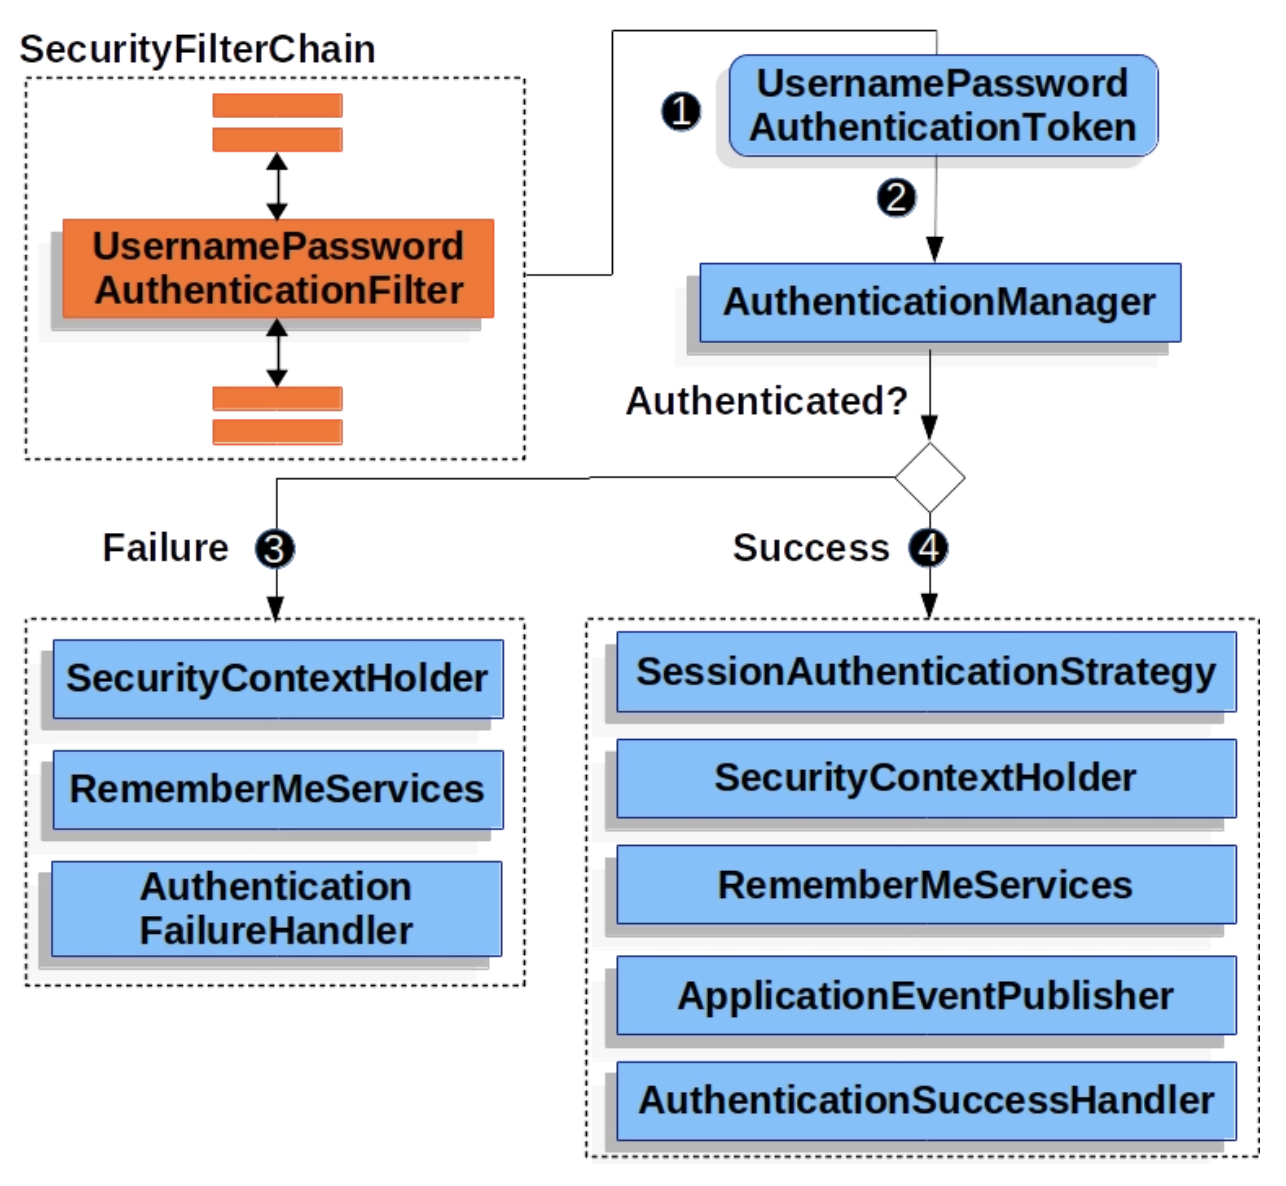
UsernamePasswordAuthenticationFilter는 Spring Security의 필터인 AbstractAuthenticationProcessingFilter를 상속한 Filter임
기본적으로 Form Login 기반을 사용할 때 username과 password를 확인하여 인증
인증 과정
사용자가 username과 password를 제출하면, UsernamePasswordAuthenticationFilter는 인증된 사용자의 정보가 담기는 인증 객체인 Authentication의 종류 중 하나인 UsernamePasswordAuthenticationToken을 만들어 AuthenticationManager에게 넘겨 인증을 시도함
실패하면 SecurityContextHolder를 비움
성공하면 SecurityContextHoler에 Authentication을 세팅함
- Spring Security - Filter Chain
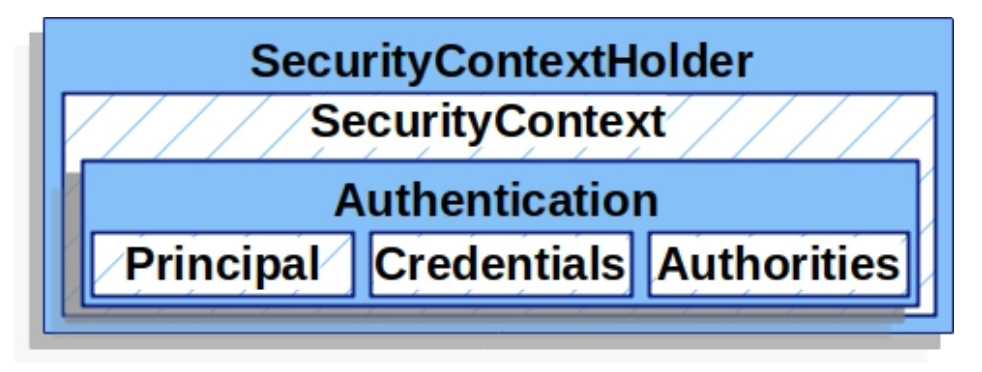
- SecurityContextHoler
- 인증이 완료된 사용자의 상세 정보(Authentication)를 저장함
- SecurityContext는 SecurityContextHolder로 접근할 수 있음

- Authentication
- 현재 인증된 사용자를 나타냄
SecurityContext에서 가져올 수 있음
- principal: 사용자를 식별함
Username/Password 방식으로 인증할 때 일반적으로 UserDetails 인스턴스
credentials: 주로 비밀번호, 대부분 사용자 인증에 사용한 후 비움
- authorities: 사용자에게 부여한 권한을 GrantedAuthority로 추상화하여 사용
- UserDetailsService
- username/password 인증 방식을 사용할 때, 사용자를 조회하고 검증한 후 UserDetails를 반환함
- Custom하여 Bean으로 등록 후 사용 가능
UserDetails
검증된 UserDetails는 UsernamePasswordAuthenticationToken 타입의 Authentication을 만들 때 사용되며, 해당 인증객체는 SecurityContextHoler에 세팅됨
Custom 하여 사용 가능
댓글
궁금한 점, 피드백, 오류 제보를 남겨 주세요.