[TIL] Spring Advanced - Manual Bean Registration and Authentication
Manual Spring Bean registration, DI priority management with @Primary and @Qualifier, and cookie and session-based web authentication principles
한국어 원문은 여기에서 볼 수 있습니다.
[TIL] Spring Advanced - Manual Bean Registration and Authentication
What to do today
What I studied
Registering Beans Manually
Register Bean Manually
- Bean automatic registration: If you use
@Component, it will be automatically scanned by@ComponentScanand register the class as a bean.- Generally automatically registered as above
- As the size of the project grows, more beans to be registered are created, so it is convenient to use automatic registration.
- Because there are many classes related to business logic, annotations such as
@Controllerand@Serviceare used to register and manage them as beans to improve development productivity.
When to manually register beans?
- It is best to manually register objects used when handling technical issues or common interests.
- Technical support Bean: Additional and common functions to support business logic such as common log processing
- Because the number is smaller than that of business logic beans, it is not burdensome to register them manually.
- When a problem occurs in a manually registered bean, it is easy to determine the location.
How to manually register beans
1
2
3
4
5
6
7
8
@Configuration
public class PasswordConfig {

@Bean
public PasswordEncoder passwordEncoder() {
    return new BCryptPasswordEncoder();
}
}
- Declare a method that returns the object you want to register as a bean and set
@Bean - Set
@Configurationin the class to which the method that registers the bean belongs. - When the Spring server is launched, it is saved as a ‘Bean’ in the Spring IoC container.
- ‘Bean’ name: Method name with
@Beanset ex)public PasswordEncoder passwordEncoder() {..}-> passwordEncoder
- ‘Bean’ name: Method name with
If there are two beans of the same type
-Chicken
1
2
3
4
5
6
7
8
9
10
11
12
  package com.sparta.springauth.food;

  import org.springframework.stereotype.Component;

  @Component
  @Primary
  public class Chicken implements Food {
      @Override
      public void eat() {
          System.out.println("치킨을 먹습니다.");
      }
  }
1
 - @Primary: Even if there are multiple beans of the same type, a bean object with @Primary set is injected first. - Pizza   ``` java   package com.sparta.springauth.food;
import org.springframework.stereotype.Component;
@Component @Qualifier(“pizza”)
public class Pizza implements Food { @Override public void eat() { System.out.println(“피자를 먹습니다.”); } }
1
2
3
4
5
6
7
8
9
  - Added `@Qualifier("pizza")` to Pizza class.
  - If you add `@Qualifier("pizza") to the field you want to inject (test field), the corresponding bean object will be injected.
-Food Interface
  ``` java
  package com.sparta.springauth.food;

  public interface Food {
      void eat();
  }
1
2
3
4
5
6
7
8
9
10
11
12
13
14
15
16
 - Registered Food type Bean objects Chicken and Pizza. - test code   ```   @SpringBootTest   public class BeanTest {

  @Autowired
  @Qualifier("pizza")
  Food food;

  @Test
  @DisplayName("Primary 와 Qualifier 우선순위 확인")
  void test1() {
      // 현재 Chicken 은 Primary 가 적용된 상태
      // Pizza는 Qualifier 가 추가된 상태입니다.
      food.eat();
  }   }   ```    - If you use it like `@Autowired Food food;`, you need to inject a bean into the food field, but since there is more than one bean object of the same type (chicken, pizza), an error occurs because you do not know which bean to register.
 - Can be solved by specifying the registered bean name
   `@Autowired Food pizza;`, `@Autowired Food chicken;`
   - You can see that `@Autowired` basically supports DI with Bean Type (Food), and if connection is not possible, it searches for Bean Name (chicken, pizza).
- If Qualifier and Primary are applied to beans of the same type at the same time, the Qualifier has a higher priority.
- However, in order to apply the Qualifier, you must add the Qualifier to the place where you want to inject it. -> Therefore, when there are multiple beans of the same type, it is recommended to set Primary for bean objects that are used generally and to use Qualifier for bean objects that are used locally.
Certification and Authorization
- Authentication
- Concept of verifying that the user is a real user Authorization
- Concept of checking permission to see if the user can access a specific resource
Special features of web application authentication
- It generally has a server-client architecture, and in reality these two elements are very far apart.
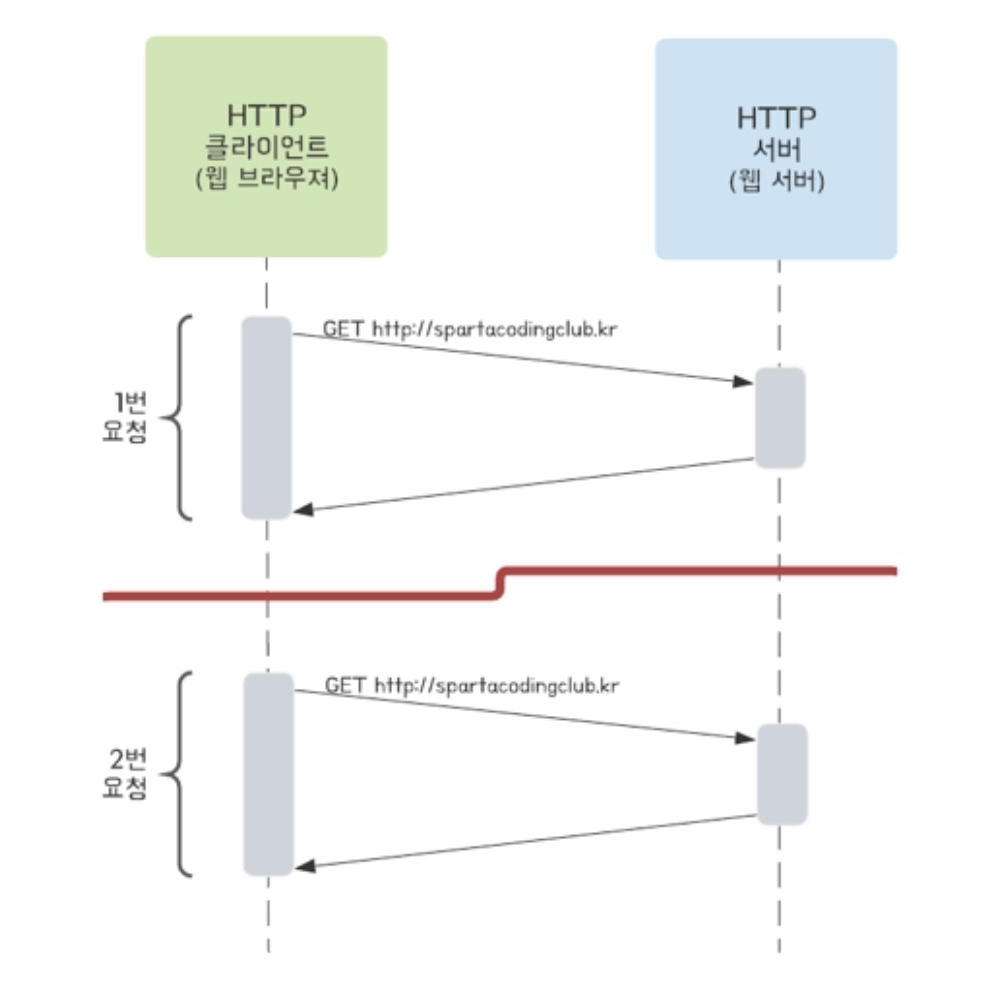
- It communicates using a protocol called Http, and the communication is connectionless and stateless.
- Connectionless: The server and client are not connected.
- To save resources
- If the server and client are actually continuously connected, the cost of the server increases exponentially. -> So when the server actually sends a response, it disconnects. - Stateless: The server does not save the client’s state.
- Because saving the existing state also increases the cost and burden of the server, it is implemented using a protocol that assumes there is no existing state. -> In reality, the server has no idea what requests the client sent before.#### Authentication method - Generally, web applications handle authentication through two methods.
- Cookie-session type authentication
- How the server stores the status of ‘a specific user is logged in’
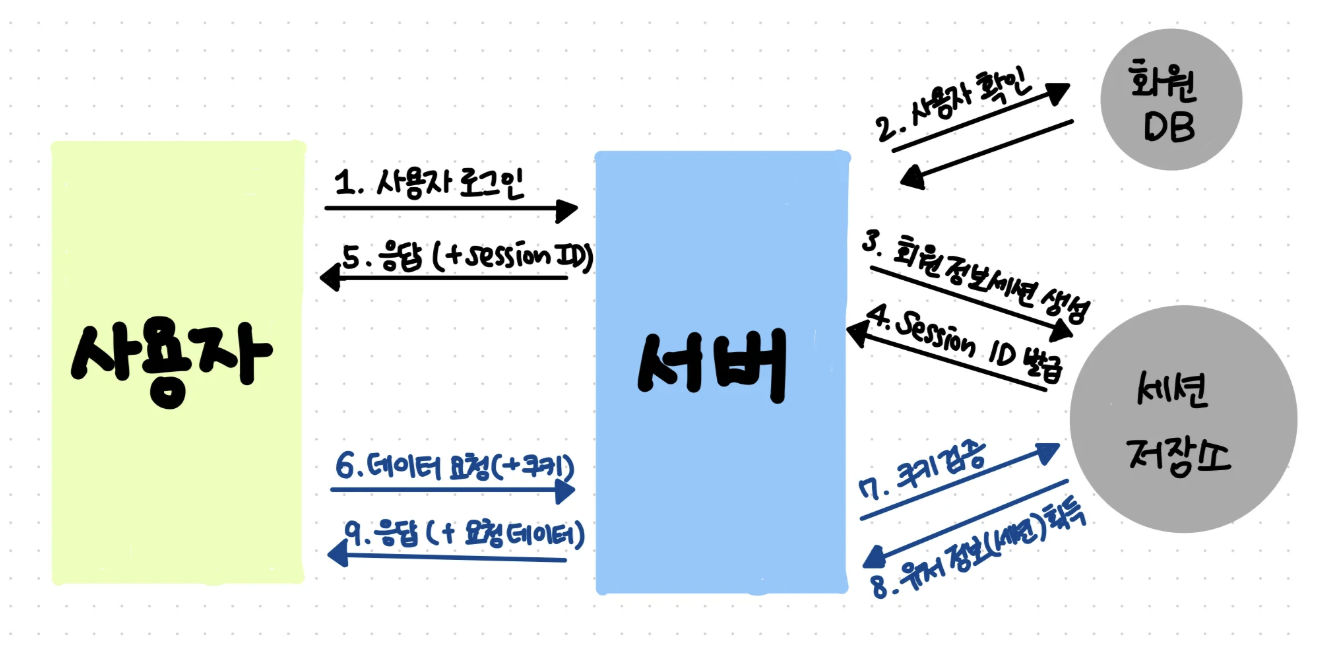
- User sends a login request
- The server checks the ID and password in the user table of the DB.
- If it matches the information in the actual user table, it is considered to have passed authentication and the information that the user has logged in is entered into the “session storage”.
- Session storage issues session-id, a random number unrelated to user information.
- The server returns vision-id in response to the login request.
- The client stores the session-id in a storage called a cookie and sends the session-id with each future request (mainly sent in the HTTP header).
- If a cookie is found in the client’s request, the server verifies the cookie in the session storage.
- If user information has been received -> This user is a logged in user.
- Afterwards, a response is provided according to the logged in user.
- How the server stores the status of ‘a specific user is logged in’
- JWT-based authentication
- JWT (JSON Web Token): refers to a token that encrypts the information required for authentication.
- JWT-based authentication is similar to the cookie/session method, where the server identifies the client by placing a JWT token (Access Token) in the HTTP header.
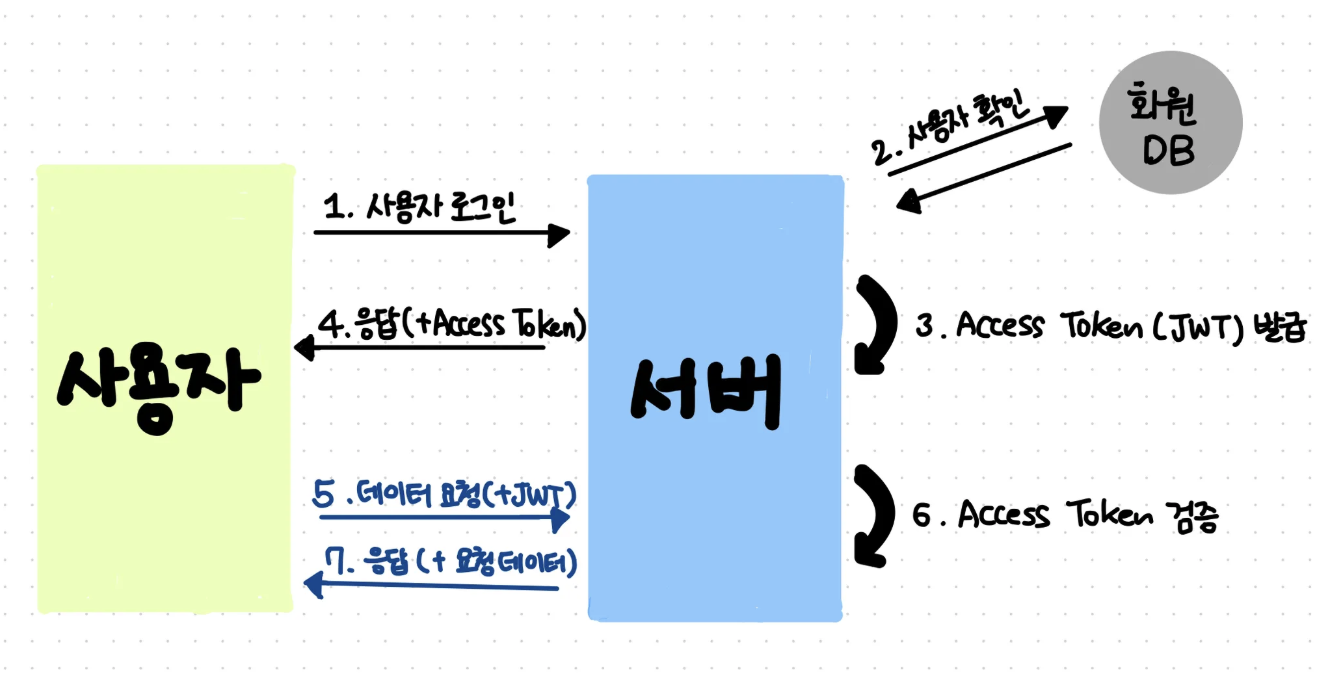
- User sends a login request
- The server searches the user table in the DB and compares the ID and password.
- If it matches the information in the actual user table, it is considered to have passed authentication and the user’s information is encrypted as JWT and exported.
- The server gives a jwt token in response to the login request.
- The client stores the token in storage and sends the token with each future request.
- If a token is found in the client’s request, the server verifies the token.
- Afterwards, a response is provided according to the logged in user.
Cookies and sessions
- Both cookies and sessions are used to maintain stateful information in HTTP.
- Through cookies and sessions, the server can authenticate and authorize each client.
- Cookies
- A file containing small information created for the purpose of being stored on the client.
- Developer Tools > Application > Storage > Cookies
- Components:
- Name: Key used to distinguish cookies
- Value: Cookie value
- Domain: Domain where cookies are stored
- Path: Path where cookies are used
- Expires: The expiration date of the cookie (deleted after the expiration date)
- Session
- Used by the server to maintain the client state for a certain period of time
- The server assigns a unique ‘session ID’ to each client and then stores the necessary information for each client on the server.
- The ‘Session ID’ generated by the server is stored as the client’s cookie value (called a ‘session cookie’) and is used to identify the client.
- How sessions work
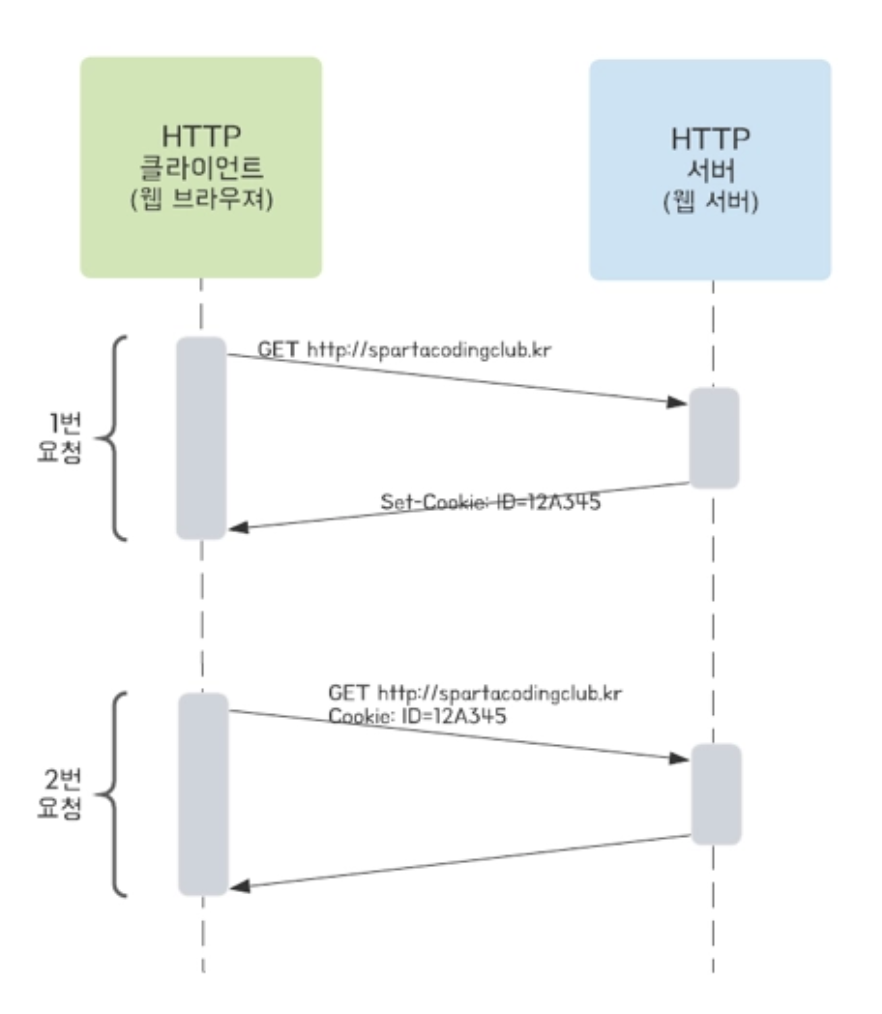
- Client makes one request to server
- The server creates a session ID, puts it in a cookie, and sends it to the response header. - Session ID format: “SESSIONID = 12345”
- The client stores the session ID in a cookie (‘session cookie’)
- Client requests twice to server - Request including cookie value (session ID)
- The server checks the session ID and recognizes that it is the same client as request 1.
- Cookies
Cookie handling
- Create Cookies
1
2
3
4
5
6
7
8
9
10
11
12
13
14
15
  public static void addCookie(String cookieValue, HttpServletResponse res) {
      try {
          cookieValue = URLEncoder.encode(cookieValue, "utf-8").replaceAll("\\+", "%20"); // Cookie Value 에는 공백이 불가능해서 encoding 진행
          // cookieValue 값에 있는 공백을 없애주는 코드

          Cookie cookie = new Cookie(AUTHORIZATION_HEADER, cookieValue); // Name-Value
          cookie.setPath("/");
          cookie.setMaxAge(30 * 60);

          // Response 객체에 Cookie 추가
          res.addCookie(cookie);
      } catch (UnsupportedEncodingException e) {
          throw new RuntimeException(e.getMessage());
      }
  }
new Cookie(AUTHORIZATION_HEADER, cookieValue);: Creates a Cookie object that receives the Name and Value to be stored in the Cookie as a constructor.setPath("/"),setMaxAge(30 * 60): Specify path and expiration time.- Add the created Cookie object to the HttpServletResponse object and return it to the browser.
- Cookies returned in this way are stored in the browser’s cookie storage.
Cookie creation is declared as a static method because it can be used for general purposes.
- Read Cookies
1
2
3
4
5
6
@GetMapping("/get-cookie")
public String getCookie(@CookieValue(AUTHORIZATION_HEADER) String value) {
  System.out.println("value = " + value);

  return "getCookie : " + value;
}
@CookieValue("Cookie의 Name"): If the name information of the cookie is passed, the value of the cookie is retrieved based on that information.
Session handling
- Servlet provides HttpSession, which allows you to easily create a unique ‘session ID’.
- Create HttpSession
1
2
3
4
5
6
7
8
9
10
@GetMapping("/create-session")
public String createSession(HttpServletRequest req) {
  // 세션이 존재할 경우 세션 반환, 없을 경우 새로운 세션을 생성한 후 반환
  HttpSession session = req.getSession(true);

  // 세션에 저장될 정보 Name - Value 를 추가합니다.
  session.setAttribute(AUTHORIZATION_HEADER, "Robbie Auth");

  return "createSession";
}
- Sessions can be created and returned using HttpServletRequest
req.getSession(true): If a session exists, returns the session; if not, creates a new session.- Information to be saved in the session is added in Name-Value format.
- Since the session is just an empty space, we must manually enter the information we want (login information, user information, etc.)
- session = req.getSession(true) checks whether a session exists for the user who sent the request, and session.setAttribute(AUTHORIZATION_HEADER, “Robbie Auth”) inserts data into a newly created or already existing session due to the previous code.
- The returned session is stored in the browser cookie storage under the name ‘JSESSIONID’.
- Read HttpSession
1
2
3
4
5
6
7
8
9
10
@GetMapping("/get-session")
public String getSession(HttpServletRequest req) {
  // 세션이 존재할 경우 세션 반환, 없을 경우 null 반환
  HttpSession session = req.getSession(false);

  String value = (String) session.getAttribute(AUTHORIZATION_HEADER); // 가져온 세션에 저장된 Value 를 Name 을 사용하여 가져옵니다.
  System.out.println("value = " + value);

  return "getSession : " + value;
}
req.getSession(false): Returns the session if a session exists, or returns null if it does not exist.session.getAttribute("세션에 저장된 정보 Name"): Use Name to retrieve Value stored in session## Problems & Errors/api/create-cookie call failed
- Problem: Request does not reach the controller
- Cause:
implementation 'org.springframework.boot:spring-boot-starter-security'dependency- Spring Security operates due to the above dependency.
- Protects all requests, requires authentication if not logged in, provides default login page with
/login-> Therefore, when making the above request, check whether the Spring Security filter has been authenticated first -> If not, redirect to/login-> The default login page is displayed.
- Solved: Even if I try to turn off the automatic security configuration state through
exclude = SecurityAutoConfiguration.classin my Spring Boot 4, there are many types, so even if I exclude one like the code above, the rest are still alive and an error occurs. -> Therefore, in main > java > config > SecurityConfig.java ``` java package com.sparta.springauth.config;
import org.springframework.context.annotation.Bean; import org.springframework.context.annotation.Configuration; import org.springframework.security.config.annotation.web.builders.HttpSecurity; import org.springframework.security.web.SecurityFilterChain;
@Configuration public class SecurityConfig {
1
2
3
4
5
6
7
8
9
10
11
12
13
14
15
16
17
@Bean
public SecurityFilterChain securityFilterChain(HttpSecurity http) throws Exception {
    http
            .csrf(csrf -> csrf.disable())
            .formLogin(form -> form.disable())
            .authorizeHttpRequests(auth -> auth
                    .requestMatchers(
                            "/api/create-cookie",
                            "/api/get-cookie",
                            "/api/create-session",
                            "/api/get-session"
                    ).permitAll()
                    .anyRequest().authenticated()
            );

    return http.build();
} } ``` When moving to the corresponding path through the code above, the default login page (`/login`) does not appear, and csrf that interferes with cookie testing is also turned off.